




Cable Tie Tools: Which One You Actually Need
Half of the manually knotted ties have been tied improperly, with only a quarter of them being tight enough to fit specifications. Ties being tied manually result in varying amounts of tension on the tie depending on the skills of the individual tying the tie. There are many companies out there who could take advantage of a simple and inexpensive solution for the problems that arise from manual tie tying.
There are handy tools available for using cable ties and trimming their ends. There are five types of such tools available in market: Plastic Tensioning Guns ($8-$15), Metal Tensioning Guns ($25-$40), High Quality Adjustable Guns ($50-$200), Flush Cutter Machinery ($10-$30) and Twist Cutter for Releasable Cable Ties ($40-$900). All the kinds of these tools guide you how to properly tighten a cable tie. If you need a cable tie tool for doing simple tasks at home, then you can buy a tensioning gun which costs merely $20. However, if you are looking to do daily panel assembly, then spend something between $30 and $40 for a good quality tensioning gun.

What a Cable Tie Tool Actually Does
- Tensioning. Pull the strap with a precise force. Too much slack results in movement of the bundle, and too much tension may break a tie or smash a jacket.
- Cutting. Trim the end. A flush cut is both a matter of safety and aesthetics since untrimmed ends have caused many injuries in electrical applications when a technician cannot see it when reaching into a panel.
- Releasing. For releasable ties, there is a release tool or a twisting cutter. Different operation, different tool.
The Five Families
| Family | What it does | Price band | Best for |
|---|---|---|---|
| Manual tensioning gun | Tensions and auto-cuts at a set point | $8–$200 | Panels, harnesses, general installation |
| Flush cutter | Cuts the tail flat to the head | $10–$30 | Finishing, and any job done without a gun |
| Twist cutter | Twists and cuts without a sharp edge | $15–$40 | Releasable ties, and where a flush edge is critical |
| Stainless-steel tool | Tensions and cuts metal ties with ball or ladder locks | $40–$900 | Outdoor, high-temperature, heavy-duty |
| Calibration gauge | Verifies a tool’s tension setting | $80 upward | Production environments, audits, ISO work |
A lot of people who buy household items need an average of one or two of them. Mistakes happen when someone buys an expensive household item to use once in a while, or buys products made from an inexpensive material, only to find out during the second month of usage that the tensioning system has failed.
Tensioning Guns, by Tier
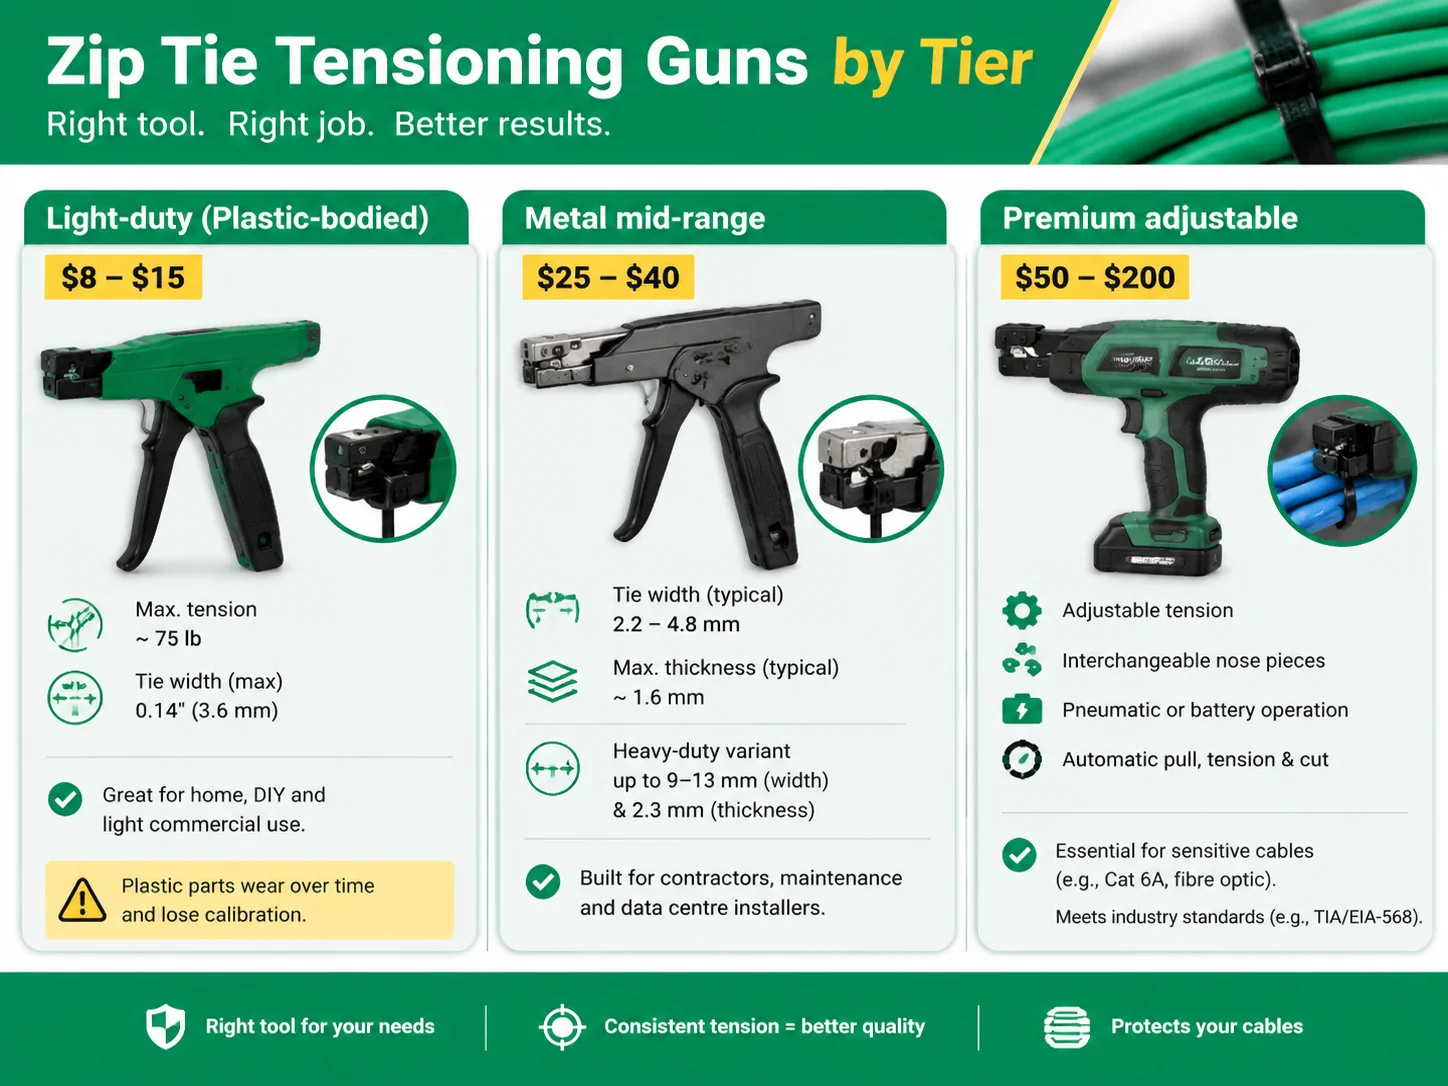
Light-duty, plastic-bodied — $8 to $15
You apply pressure on the grip, which then cuts off the tail. Its tensile strength is around 75 lbs. and can grip wires up to 0.14 inches (3.6 mm). As a result, it is useful for small and medium-sized jobs, which is the most that the typical DIYer or homeowner would need.
Mechanical limitations apply to this product. The plastic tensioner itself wears out, losing functionality in the process. If only one or two panels are done each month, this is not a big deal, but if someone uses the tool every day, then they will not be able to get the most of it.
Metal mid-range — $25 to $40
Entirely metallic construction, hardened steel tensioning parts, a built-in flush-cut blade, and a sufficient grip to deal with ties of around 12 mm in width. This is the level of quality that electrical contractors, industrial repairmen, and data center installers require, as it withstands a fall and doesn’t change position.
Within this price range, the range of tie sizes that can be accepted varies greatly. There are mid-priced models that can accommodate ties with a width of 2.2–48 mm and a thickness of up to around 1.6 mm. There are also heavy-duty models that can accommodate even larger ties, up to 9 mm or 13 mm and a thickness of 2.3 mm.
Premium adjustable — $50 to $200
Device features include the various tension settings, the fact that each device can accommodate multiple tie widths through interchangeable parts, and that most work with either air or battery. With these ties, it does not matter how strong and skilled the user is; there is no possibility of any defects due to bad technique or insufficient strength.
Automatic models combine pulling, tensioning and cutting processes into a single step. They are designed for use in assembly processes where one operator makes thousands of ties per shift, and their application comes at reasonable cost for the companies since now it is the tool that does all the work. Some heavy duty machines found at the top of this class can get very expensive.
The real value of this type of devices lies in the process of securing cable that cannot be over-tensed. In case of Category 6A and fibre optic cables performers can lose their effectiveness due to either cable being crushed or its bend radius being exceeded.The full technique for using an adjustable gun correctly is set out in this guide to using a zip tie gun for professional cable installation.
Cutters: Flush, Bevel and Twist
There are three kinds of cutting operations to choose from, and each one works differently.
- The flush cutter. The flat edge of one jaw comes in contact with the head of the tie, thus ensuring that the cut is smooth and seamless. No small protrusions are left behind, that can get snagged on an adjacent tie, or a hand for that matter.
- Standard cutter. The bevel-edged jaw does leave behind a small protrusion. In an area where many ties are used, the protrusions may create problems during tie application, and even cause painful cuts.
- Twist cutter. Generally, it will grip the tail end and twist it until it fatigue at the point of twisting.
The cutter is the cheap half of the kit and the one people skip. If you install ties at all, own a proper flush cutter — the specific options are compared in this review of zip tie cutters.
Stainless Steel Tools Are a Different Class
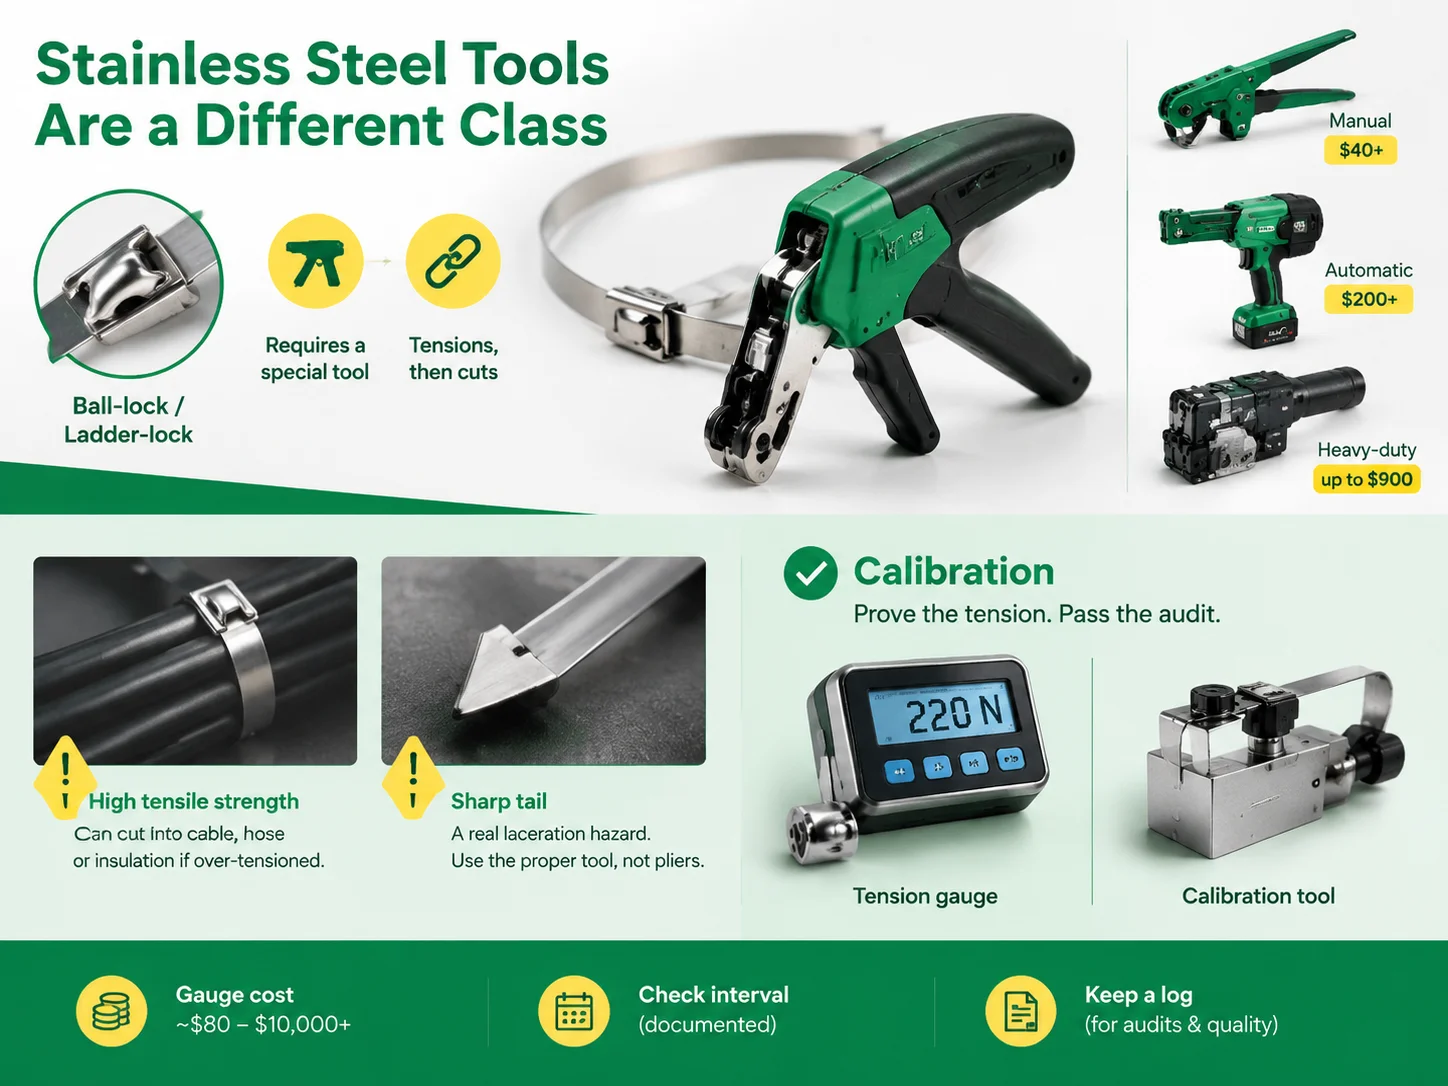
Stainless steel cable ties utilize either a ladder-lock or ball-lock system, instead of a nylon pawl, and require a specific tool. This tool is used to tension the band and is also able to chop through the lock using sufficient force to break through 304 or 316 strips, which could not be done using a nylon device.
Manual tools for stainless steel start at about $40, and they can work with a smaller band than automatic and heavy-duty devices that cost several hundred dollars and up to almost $900 for professional units. All of these tools require a certain band width and lock type, so the combination of tool and tie has to be determined as a pair.
Be aware of two things. First, the stainless ties have an extremely high tensile strength, which means that over-tensioning them can lead to them cutting through cables, hoses, or insulation where a nylon tie would only leave dent. Second, cutting the tail badly can create a real laceration risk since it will be sharper and stiffer than nylon. If you are using stainless, get a tool instead of trying to make it with a pair of pliers.
Calibration: The Part Production Buyers Forget
In scenarios where it is a must to prove the tension — due to an inspection of the installation, a customer specification requiring it, or the necessity of having a safety case based on it — it is essential to calibrate the tool and record the findings. It is where tension gauges come into play.
A tension gauge measures the force applied by the machine, and calibration equipment is used to check the calibration. Tension gauges vary in price from a simple accessory costing around 80 dollars to the sophisticated laboratory gauge with memory and data logging costing a few thousand dollars. While the high-end products can typically be passed over by most users, the existence of the range of products is important because without them there is no sensible answer to the question: “how do you know that the pressure is correct?”
In production, it suffices to have a medium-range gauge, a check schedule, and logs of checks carried out. This is enough to satisfy most inspections and to detect tool drift prior to production of a large batch of faulty units.
What Each Job Actually Needs
| Job | Right tool | Rough budget |
|---|---|---|
| Home wiring, garden, occasional bundling | Plastic-bodied gun plus a flush cutter | $20–$40 |
| Electrical panel building | Metal mid-range tensioning gun | $30–$50 |
| Data cabling, fibre, Cat6A | Adjustable-tension gun with interchangeable noses | $60–$200 |
| Automotive harness work | Adjustable gun plus a twist cutter for tight areas | $80–$250 |
| Outdoor, marine, high temperature | Stainless installation tool matched to the band | $40–$900 |
| Production line | Pneumatic or battery automatic gun plus calibration gauge | $200–$1,000+ |
A word on the lower price range: a $20 tool is not a bad product, it’s just that this is not a heavy-duty product. If you buy this product expecting to have to replace it after a few thousand uses or wear-outs, you will be satisfied. If you buy this product expecting to perform heavy-duty jobs with it, you will most probably be disappointed.
Using a Gun Properly
- Set the tension ahead of time and avoid waiting until the first crushed bundle leaves the machine. If you are using an adjustable device, start with low tension and increase it gradually.
- Thread the tail through the head part first, see if it engages before pulling with your hands. The tool is supposed to apply tension and not to thread.
- Place the nose against the head before pressing. You have to avoid the gap between the nose and the tie head, since it would lead to inconsistent tensioning and cutting.
- Make sure to press the handle all the way. Since most of the devices cut at the end of the stroke, a partial squeeze results in a tie being tensioned but the tail is left untrimmed, which is not desirable.
- Check some ties by hand. A tie that does not budge under the pressure exerted by your finger but does not leave a dent in the jacket is considered to be done correctly. If there is any visible mark in the jacket, reduce the tension.
- You need to check your ties at regular intervals. Your devices could change their settings, so a bundle produced at 9 o’clock in the morning should have the same tension as the one produced at 4 o’clock p.m.
In confined spaces technique changes completely as you cannot square the nose and the head, which means that another, more compact device has to be used.The workarounds are covered in this guide to installing cable ties in tight areas.
Maintenance and Storage
- Ensure that the cutter blade is kept sharp at all times since a dull blade tears instead of cutting and as a result leaves behind a rough and jagged tail and causes damage to the tie head.
- Make it a point to clear the tensioning mechanism of plastic debris from time to time since a blocked pawl will give incorrect tension readings.
- Never use the tensioning mechanism as a lever since it is a highly precision instrument and hence it can easily go out of adjustment.
- Ensure proper storage of the device to prevent it from impact. Whereas a metal unit can survive a fall, a plastic attachment often does not.
- If applicable, write down the date of calibration of the device and verify the date on a regular basis.
Buying Ties and Tools Together
In order to ensure they go together, one should find a place to buy the tools and the ties from the same supplier. A tie gun rated for a maximum tie diameter of 4.8 mm is not suitable for the use with a 9 mm heavy-duty tie and vice versa. Generalising on two or three tie sizes in the facility makes it important to find a universal tool instead of taking the advantage of cheaper but different products.
Cost-effective tie sourcing is convenient. When the tools and ties come from the same supplier, volume pricing is appropriate and gets the desired result.A heavy-duty cable tie manufacturer supplying industrial volumes can usually recommend the correct tool for each tie family rather than leaving you to work it out from a catalogue.
FAQ
What is the best tool for cutting cable ties?
A flush cutter has one blade of the jaw cut flat to achieve a smooth cut of the tail with no projecting stump left behind. A tensioning gun with a built-in flush blade cuts flush and tensions wires with only one press. Do not use a standard bevel cutter or side cutter for the final trimming as they will leave a sharp stump sticking out that can catch on nearby wires or your fingers.
Is there a tool for zip ties?
Indeed, there are two types available: (1) a tensioning gun which not only pulls a tie to the desired tension but also cuts off the excess strap. (2) A cutter is simply used to cut where ties have been installed by hand or a gun could not reach. Tensioning machines start at $8 for a basic machine made of plastic to $200 for a quality adjustable tensioning machine.
What is a cable tie tool?
A type of manual equipment, which tightens a zip tie to the desired amount of tension and also cuts off the unnecessary part of the zip tie. It replaces the plier method of zipping a zip tie that depends on the person using it, but yields the same results every time, even when the equipment is used for the five-hundredth time. Advanced versions allow one to regulate tension and change working heads.
Do I need a special tool for metal zip ties?
Indeed, stainless steel straps feature ball-lock or ladder-lock mechanisms and necessitate the use of a device that is capable of both tightening and severing the metal strap – something a nylon strap gun is incapable of providing. Manual stainless steel tools start at a price of about $40 each; more advanced automatic versions will typically run several hundred dollars. The tool has to be matched to the band width, and any improper cut of the stainless tail creates serious cutting issues, hence it is unwise to use pliers for this operation.
References
- HellermannTyton — cable tie tensioning tools, calibration accessories and application guidance
- Panduit — cable tie installation tooling, tension specifications and blade accessories
- DigiKey — wire tie gun and accessory listings with published pricing across tool classes
- Thomas & Betts — Ty-Rap installation tools and stainless steel tie systems
- McMaster-Carr — tensioning tools, flush cutters and twist cutters with dimensional specifications
- Grainger — cable tie tool pricing and stock availability across light, mid and premium tiers
- TIA — structured cabling standards covering cable tie spacing and tension limits
- UL Solutions — UL 62275, the cable tie product standard covering construction and performance
Conclusion
The cable tie tool is one of the items that is getting more and more popular. With the help of the tool, a person can go from the basic tying of nature to proper installation. There are a lot of different kinds of cable tie tools that exist today. Depending on how often you plan to use your cable tie tool, there is the option of a plastic cable tie tool for rare usage, a metal cable tie tool for frequent usage, and an adjustable cable tie tool when you want to ensure that the cable ties are not too tight. Whichever kind of tool you opt for, you will have to have side cutters for cleaning up the extra sharp ends of the cable ties. In addition, if there is a need to regulate the tension exerted while using cable ties, a gauge could also be employed.