




Do you know how to remove a Cable Tie?
A cable tie is designed to be slipped on in one second flat, gaining it its unique properties, but also making its removal quite challenging when needed. On one hand, it can be difficult to find a cable tie in the right place, on the other hand, it could be that a bundle that appeared finished needs to be opened, or that an otherwise perfectly normal cable tie should be saved instead of discarded. Knowing how to remove a cable tie without any mistakes helps to distinguish between a mission completed in five seconds and getting a injured finger, as well as damage to the cable and ruining the fastener.
The good news is that, once one learns how the tiny locking mechanism located in the head works, they can remove a cable tie within seconds. This guide includes plenty of methods for removing various types of cable ties, including reusable cable ties and the traditional ones without the need of cutting it off, as well as those that require cutting.
Reasons a cable tie cannot be released easily
Knowing why a tie does not cooperate will be an advantage in the battle. The way nylon ties work is almost the same regardless of its type. A one side of the flat strip is equipped with teeth, while the square head has a small pawl. When you pass the strip through the head then tug, the teeth will go past the pawl, and the latter will catch between the teeth in order to stop the strip from going back. Thus, it is possible to pull a tie tighter using a one-side ratchet but not to release it from its locked position.
Such a feature is exactly what you need, as it prevents cable tie from loosening when under pressure. In other words, in order to take off a cable tie you need to do one of two things: remove the pawl from the teeth or just cut it.
Start here: one question decides your method
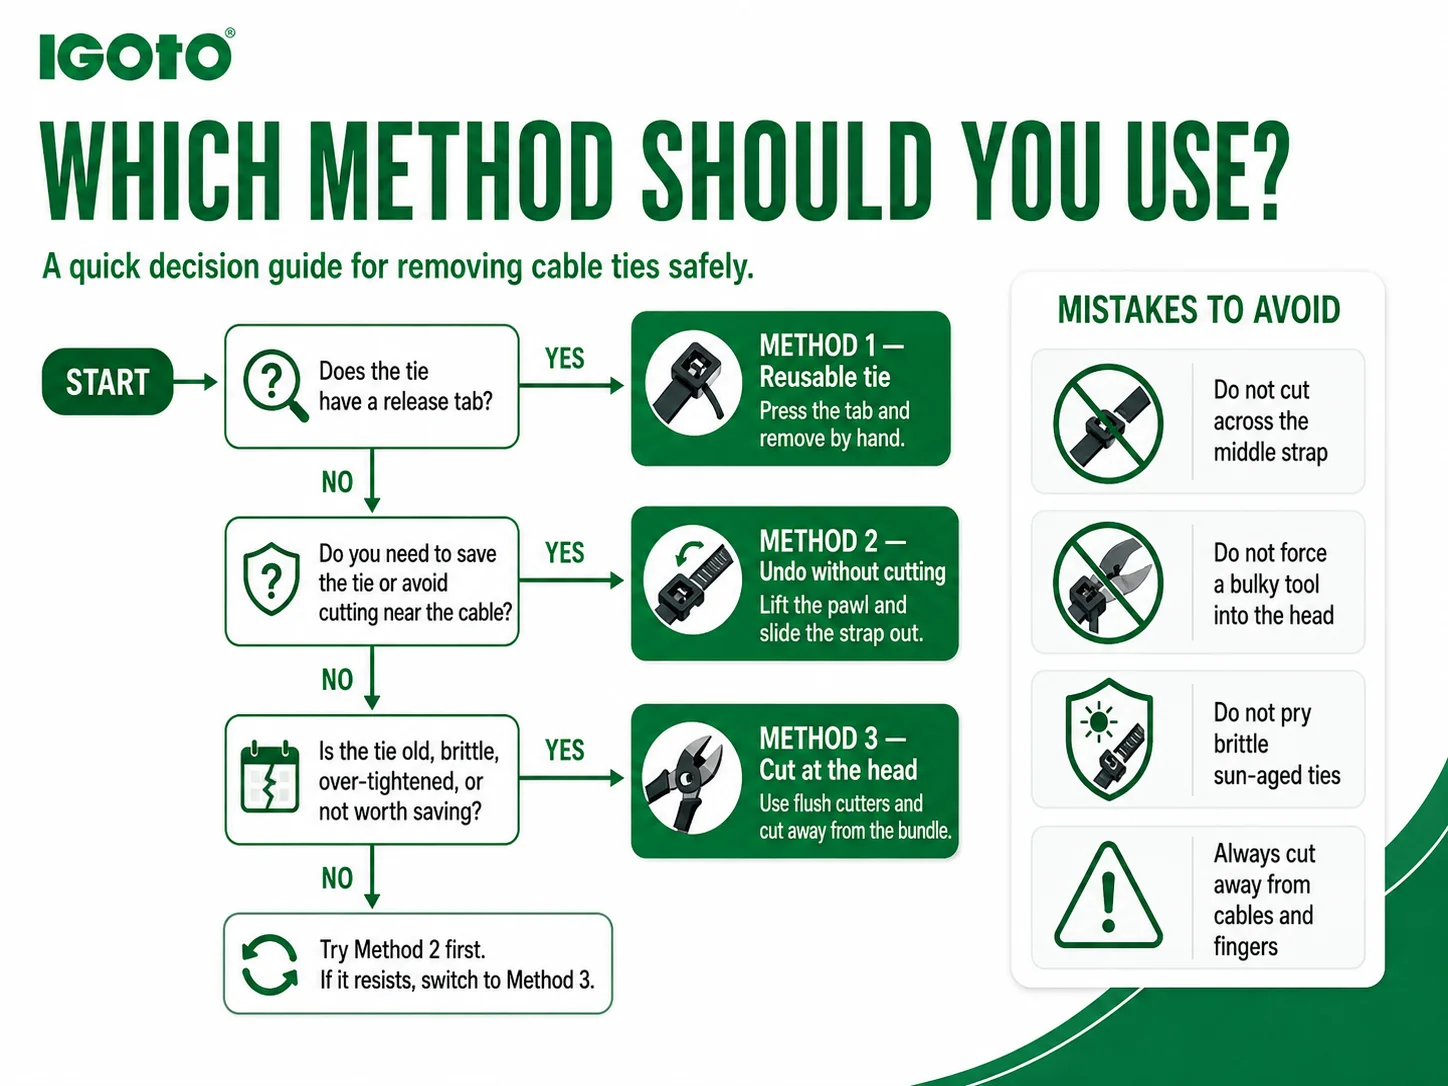
Before you reach for a tool, you should consider one crucial question: Do you need to keep the tie and protect what’s beneath it? Your response will guide you in choosing the correct method.
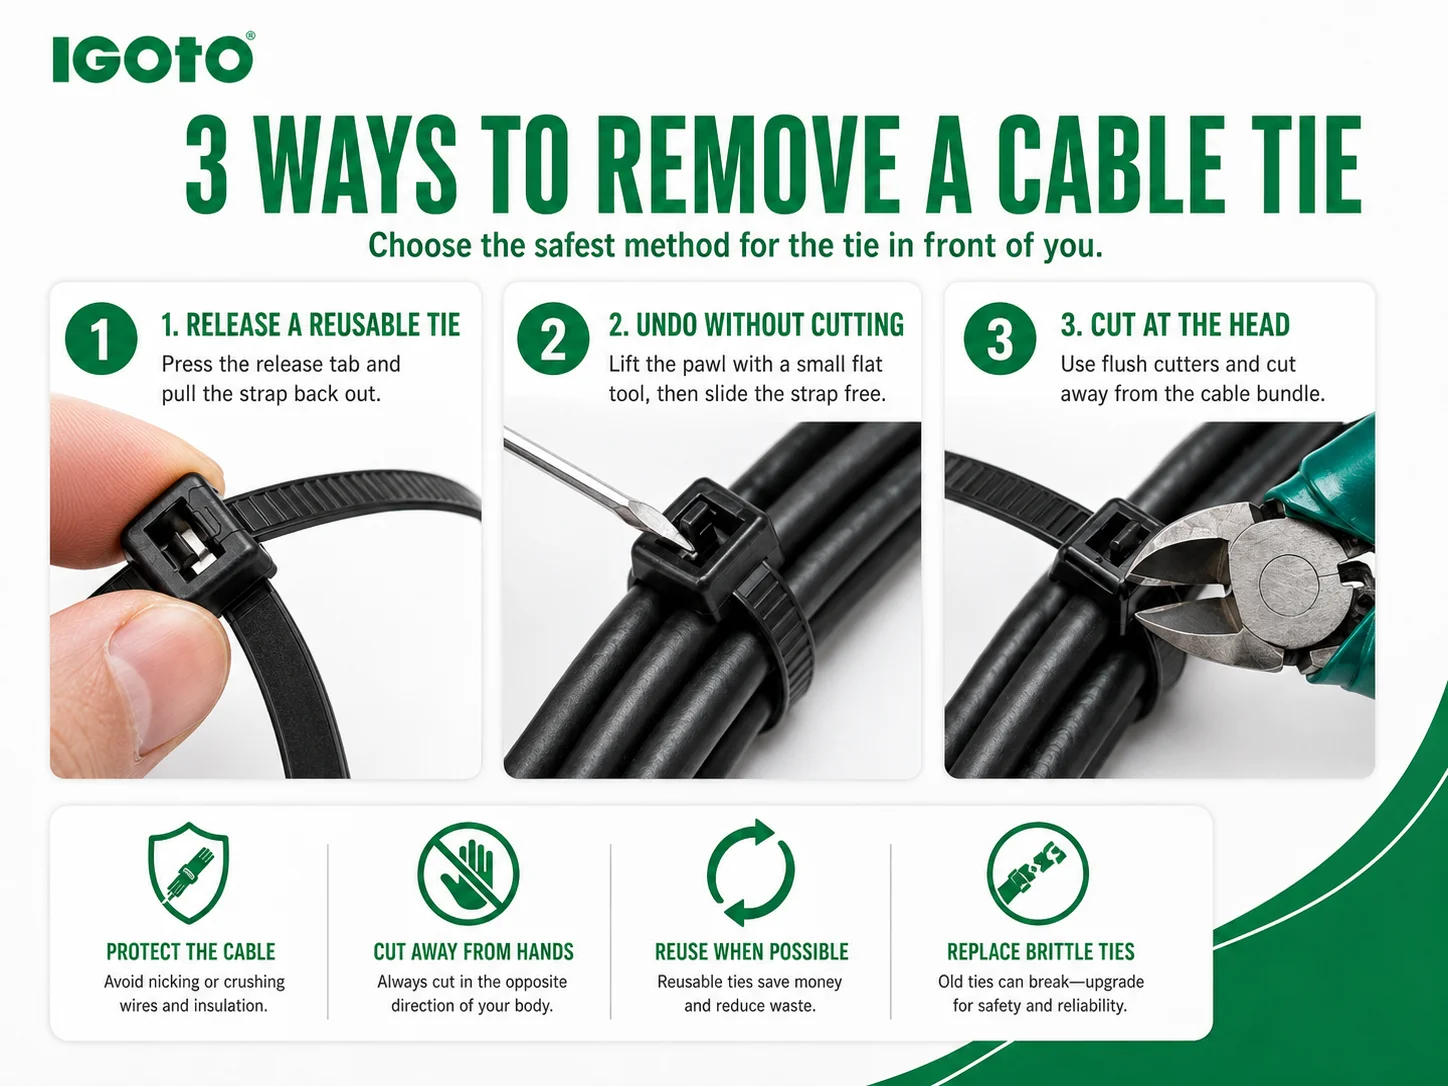
If the tie is equipped with a lever or plastic tab, it means it is a releasable tie, which is very easy to remove by hand (see Method 1).
If the tie is of the standard type and you want to reuse it, or you have to avoid cutting near the cable, you can release the pawl and pull the strap out (see Method 2).
If you don’t care about reusing the tie, or if it is too old, brittle, or tightly secured, then the best option is to cut it (see Method 3).
In cases when a tie surrounds a delicate object that carries current or is under tension, for example, a wire or a wire harness, you should determine the method before you even start acting. Not knowing how to carry out the procedure may lead to damage either to the tool or to the object.
Method 1: Release a reusable tie by hand
The simplest situation is the one that individuals do not notice. Releasable (or reusable) ties are made to come off without utilizing a tool of any sort. The head houses a small lever or tab as opposed to the fixed pawl that helps move the pawl when either lifted or pressed. If you closely observe the head and see the small flag/tab/button that is not characteristic of a non-releasable tie, you can be sure that you are dealing with a releasable tie.
To open the tie, keep the head steady, use your thumb or fingertip to press the release tab, then slowly pull the tail through the slot while pressing the tab. The strap slides back through the slot neatly and may be reused again. No cutting, no tools, and no damage done to the cables. If you are not sure which ties in your drawer are reusable, our overview of assorted zip ties and how they work breaks down the different reusable families and how each one opens.
Method 2: How to remove a cable tie without cutting
Most ties in the wild are standard, single-use nylon — no tab, no lever. The good news is you can still often undo one without cutting it, as long as you can reach the head and the tie is not brittle. The trick is to do by hand what the release tab does for you on a reusable tie: push the pawl up and off the teeth so the strap can reverse out. Learning to remove a cable tie without cutting is the single most useful skill here, because it saves the tie, protects the cable, and leaves no sharp tail behind.
What you need
Any object that is flat and thin will work for this. A jeweller’s screwdriver or a small flathead screwdriver functions the best. A safety pin, sewing needle, or even a sturdy fingernail can work for lighter ties. The only rule to remember is whether your tool is thin enough to fit in the head without being fat enough to bend the pawl. A bent pawl will never work properly for future reusing of ties.
Step by step
- Find the head of the tool and then determine from where the strap is fed in. You should see the little pawl that is sitting there pressing against the teeth of the strap.
Using your implement, put the tip between the pawl and the teeth on the same side where the strap is coming in.
Gently push the pawl away from the teeth — you are just lifting it and not taking everything apart completely. You are only moving it slightly by few millimeters.
While you have your pawl at the right position move the strap’s tail out using the other hand.
If you feel that the strap locked somewhere, do not pull but rather take the tool off and try again.
The no-tool fingernail method
For a tie that is only lightly tightened, you may not need a tool at all. Press a fingernail against the pawl through the slot to nudge it off the teeth, and pull the tail back at the same time. It takes a little feel, and it works best before the tie is fully cinched, but for a loosely fastened tie it is the fastest way to remove a cable tie with nothing but your hands.
It should be noted: the tighter the tie, the more complicated the situation becomes. When the tie is fully tight, the ratchet gets stuck in the teeth and it is practically impossible to use any equipment. If you have tried to cut the tie two or three times without success, it is better to abandon the effort and make a cut.
Method 3: Cut it off cleanly when reuse isn’t possible
When a tie becomes aged, inflexible, overly taut, or simply of no use, then initiating a cut is a safer and faster solution than trying to deal with the pawl. The most important thing here is where to cut. Do not make a cut in the middle of the strap since that is where it is in contact with the package since it is in the place where the blade will easily slip downward on the cables and fingers. Instead, cut it at its top end, which is the area of the short distance between the package and the lock head, making sure that the cutting inclination of the blade is to the side of the package.
A small pair of flush cutters or side cutters is the right tool for nylon. One firm, clean squeeze parts the strap and the tie falls away, with no jagged tail left behind. Scissors and utility knives work in a pinch but leave rougher edges and carry more risk, so save them for when nothing better is on hand. For the full breakdown of which tools give a clean, safe finish — and which to avoid — see our guide on how to cut cable ties. And if you are dealing with more than one tie at a time, or a tougher stainless-steel tie that needs different tools, our companion article on removing cable ties safely by type covers those cases in depth.
A tensioned tie contains energy. When you release the tension with a cut, the tension is let go instantly, and cut cable or the cutter can rush towards your face or arm. Always keep the tie in one hand and cut with the other one, moving the cutting edge away from cables.
Removing a cable tie in tricky situations
The three methods above handle most jobs. A few common situations, though, need a small adjustment.
A tie that’s far too tight
An over-cinched tie leaves almost no gap for a tool at the pawl. Rather than gouging at the head, cut it — the strap is under so much tension that a single clean cut at the head is both the quickest and the least risky option. Trying to save a badly over-tightened tie usually ends with a slipped tool and a scored cable.
A tie you can barely reach
Deep inside an enclosure or a wiring loom, the problem is access, not the tie itself. A narrow-nose flush cutter reaches where fingers cannot, and cutting the head from an angle is safer than blindly working a screwdriver into a slot you cannot see clearly. If confined spaces are a regular headache for you, our guide to installing and working with cable ties in tight areas covers the slim tools and angles that make cramped work manageable.
Removing a tie without damaging the cable underneath
The biggest danger when performing a removal is scratching the insulation on the wire that the tie protects. Two things that help avoid this danger are cutting through the head instead of the strap and pointing the cutting edge away from the bundles. When the tie is removed without cutting, the danger is eliminated altogether — that is why it is important to become familiar with the no-cut method described in Method Two when doing delicate work.
A brittle or sun-aged tie
A tie that has spent months outdoors can go brittle, especially if it was not UV-stabilised. Do not try to lever the pawl on one of these — the head can shatter and fling fragments. Cut it cleanly at the head and replace it, ideally with a UV-rated tie if it is going back outside. Matching the tie to the environment from the start is covered in our guide to choosing the right cable ties.
Mistakes to avoid
Most issues with removals can be attributed to a few common mistakes:
– Cutting the strap in the middle rather than at the head – blades can easily wander onto wires or flesh.
– Trying to fit a big tool into the head, which can damage the pawl and make it impossible to reuse the tie afterwards.
– Not taking stored tension into account and cutting through a tight tie with one hand, which might cause it to snap back.
– Trying to operate the pawl on a brittle old tie, which can break the head instead of releasing it.
– Using knives directed toward yourself – you have to always cut in the opposite direction of the body and the bundle.
All of this unwanted labor can be avoided if one slows down for just two seconds, inspects the head, and selects the right operation according to the tie being removed.
When to choose releasable-ties
If you have trouble taking the same ties off repeatedly from one bundle, like a control panel that has to be opened every three months, a rack that needs to be patched every week, or a setting still in the prototype phase, the solution is not to find a better removal approach. Rather, it is better to use a tie that is designed to be removed. A releasable tie has the same holding capacity as regular ties until one touches the release tab. Then, it goes back on. No tools, no cutting and no excessive material on the floor.
Of course, standard ties are still effective for the times when the job is permanent and should be done once. However, if an application needs to be opened again, those ties will pay for themselves on the second use. igoto provides a full range of ties types: standard, releasable ones and those that are sunshine-proof and made of rust-proof steels. To match the head style and material to your application, our guide to choosing the right cable ties lays out the options side by side.
Quick answers
Can you reuse a cable tie after removing it?
A releasable tie is made for this — press the tab, pull out the strap, and refasten it. In some cases, a standard tie can be reused if you are very careful in raising the pawl, and if both the teeth of the strap and the pawl itself are OK. Check out the tie before reusing it; if it seems worn, do not use it again.
How do you remove a cable tie without any tools?
To release a releasable tie, press down on the tab with your thumb and pull it back. In the case of a standard tie that is only slightly tight, place the fingernail against the ratchet below the slot while pulling back on the tail. If the standard tie is tightly secured, it is better to use tools or make a clean cut instead of using force.
What is the best tool to remove a cable tie?
For cutting, a small pair of flush cutters gives the cleanest, safest result on nylon. For undoing a tie without cutting, a jeweller’s flathead screwdriver or a stout pin is ideal for lifting the pawl. The full tool rundown lives in our how to cut cable ties guide.
Why won’t my zip tie loosen when I pull it?
Because it is not meant to. The one-way pawl inside the head blocks the strap from sliding backward, so pulling only tightens it. To open a standard tie you must lift that pawl off the teeth or cut the strap — you cannot simply reverse it out.
The bottom line
The removal of one tie may seem trivial but can pay off greatly in the future. “Read the head: tab means that you should release it manually, while standard head indicates that the user must either lift the pawl to detach the tie without cutting or make only one cut directly at the head.” Always hold the tie while you make the cut, and instead of forcing the previously too-tight tie, simply apply more pressure slowly. Do that, and knowing how to remove a cable tie becomes a two-second habit rather than a fight — and if you are opening the same bundle over and over, that is your cue to switch to a reusable tie and stop removing them the hard way altogether.